DIY Wooden Bloom Box 3D Puzzle Kit: Build, Finish, Display
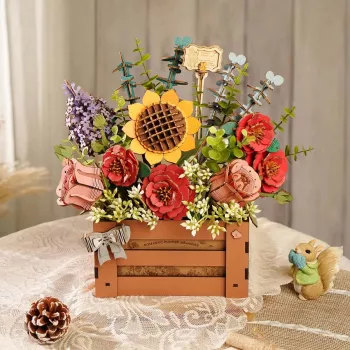
DIY Wooden Bloom Box 3D Puzzle Kit
A bloom box build combines hands-on crafting with a finished piece that looks like decor. This kit is designed for anyone who enjoys assembling precision-cut wooden parts into a 3D display model—ideal for a relaxed weekend project, a screen-free activity, or a gift that feels personal once completed.
What the Bloom Box Build Experience Feels Like
Building a wooden bloom box is the kind of project that starts as a puzzle and ends as a display piece. Each step rewards careful alignment: tabs slide into slots, layers stack in sequence, and the overall shape becomes more defined with every successful connection. It’s a tactile, satisfying rhythm—sort, test-fit, press, repeat.
- A step-by-step assembly project that rewards patience and careful alignment
- A display-forward result that can live on a shelf, desk, or craft corner
- A satisfying mix of puzzle-solving and model-building without needing special workshop tools
- A calming, focused activity suitable for solo time or shared crafting sessions
Because the parts are typically lightweight and precision-cut, the build feels more like a detailed craft session than a heavy-duty woodworking project. If you enjoy concentrating on small wins—one clean connection at a time—this is an especially enjoyable format.
What’s Included and What to Prepare
A smooth build depends on two things: having the right small tools nearby and setting up a workspace that keeps tiny parts from getting lost. The kit focuses on interlocking wooden components, so you won’t need a workshop—just a well-lit table and a little organization.
- Pre-cut wooden sheets/components designed to interlock during assembly
- Instruction guide with a build sequence to reduce trial-and-error
- Recommended basics to have on hand: craft knife (for tiny tabs), tweezers, sanding stick, and a small tray for parts
- Optional upgrades: wood glue for extra durability, clear coat for protection, and a soft brush for dusting
- Workspace tips: bright lighting, a flat surface, and a container for separating similar pieces
If you plan to seal or finish the model, good ventilation matters—especially with certain coatings. For an overview of indoor air considerations around finishes and fumes, the EPA’s guide to volatile organic compounds (VOCs) and indoor air quality is a helpful reference.
Skill Level, Time, and Who It Suits
This bloom box is best for builders who like following diagrams and working with small parts. It’s approachable for first-timers, but it still delivers that “I made this” payoff that experienced crafters look for.
- Best for builders who enjoy following diagrams and working with small parts
- Estimated time varies by pace; planning for multiple short sessions helps reduce fatigue and mistakes
- Good fit for teens and adults; younger builders generally do best with supervision for delicate steps
- Giftable for birthdays, holidays, and creative occasions—especially when paired with a display stand or small light
| Builder type | Why it fits | Helpful tip |
|---|---|---|
| First-time model builder | Clear progression and repeatable steps | Sort parts before starting |
| Puzzle fan | Pattern recognition and precise placement | Dry-fit pieces before pressing fully |
| Craft/DIY hobbyist | Room to personalize and reinforce | Add a light clear coat for longevity |
| Gift maker | Finished piece looks like decor | Include a note with the build date |
Time-wise, many builders prefer spacing it out: a first session for sorting and early structure, then one or two additional sessions for detail sections and final alignment. That pace reduces “rushing pressure,” which is when tabs are most likely to stress or split.
Assembly Tips for a Cleaner Finish
Small habits make a big difference in how clean the finished model looks. The goal is to keep connections snug without forcing them, and to avoid marks on the wood surface as you handle parts repeatedly.
Hand cleanliness also helps protect the finish from smudges during long builds. If you’re crafting with others or taking breaks between sessions, a quick wash before returning to the parts keeps the wood looking fresh—see the NIH overview on hand hygiene basics for a practical refresher.
For families building together, it’s also smart to review basic craft safety for sharp tools like hobby knives; the CPSC’s Art and Craft Safety Guide covers common-sense precautions.
Personalization and Display Ideas
Care, Storage, and Longevity
Where to Get the DIY Wooden Bloom Box 3D Puzzle Kit
If you’re ready to build, the DIY Wooden Bloom Box 3D Puzzle Kit is currently listed at $61.51 (USD) and marked in stock. For the most accurate details, check the product page for current stock count, shipping information, and additional images.
- DIY Wooden Bloom Box 3D Puzzle Kit (build-and-display project)
- Gogo 1/6 BJD Doll with Big Head & Dimples (collector-style gift with character)
- 3-Level Modern Cat Tree with Scratching Pad, Cushions, Condo and Toy (home-friendly piece for pet spaces)
FAQ
Is glue required to assemble the bloom box?
Glue usually isn’t required because many wooden kits are designed to interlock, but a small amount can be used to reinforce high-stress joins. If you choose to glue, apply it sparingly to avoid staining the wood or causing swelling at tight connections.
How long does it usually take to finish a wooden 3D puzzle kit like this?
Many builders finish in about 3 to 6 hours depending on experience level and how detailed the fit is. Splitting the build into a few shorter sessions often improves accuracy and keeps hands from getting tired.
Can the finished bloom box be painted or sealed?
Yes—painting and sealing are both common ways to personalize and protect the finished piece. Test your paint or clear coat on a small hidden area first, use light coats, and allow full drying time in a well-ventilated space.










Leave a comment